The year-end close is notoriously tedious and time-consuming for finance and accounting teams.
The level of attention to detail required, as well as the pressure to meet deadlines, can take a toll on your team’s mental and physical well-being. And it doesn’t help that the period coincides with month and quarter-end reporting.
It’s no wonder three out of four companies spend up to 35 days completing the process.

The fastest organizations, as data from APQC shows, complete their year-end close in 10 days or less. The secret to their success?
They continuously work on tasks related to the close process throughout the year rather than leaving everything to the last minute.
In this blog, we’ll break down each of the steps in the year-end close and provide a handy checklist and Excel templates you can use to make the process easier for your team.
We’ll also show you how using financial close software speeds up the process so that you can complete the annual close in record time with accurate financial statements.
Year-end closing is the process of reviewing and reconciling accounts, adjusting entries (where necessary) and preparing financial statements for the fiscal year.
This process is also called “closing the books” or “annual close.”
Unlike the month-end closing process, year-end closing involves a holistic review of all financial activities and adjustments made throughout the year, such as:
The goal of closing the books is to ensure your financial statements add up—meaning they accurately reflect your company’s financial activities for the accounting year.
The best way to achieve this is to start the process early.
This way, you have accurate financial data to calculate tax provisions and proactively plan for the new year.
You’ll also avoid missing deadlines and turning in misstated financial statements.
“We tend to think, ‘Oh, that’s year-end,’ so, we save too much work for the year-end process when we should complete everything that can be done early. Go through all the balance sheet accounts throughout the year to see if there’s anything to action early (such as asking vendors to send in statements of account early, etc.). If you can get lots of prep work done and out of the way, you won’t have to deal with it at the end of the year.”
Melissa Howatson, CFO, Vena Solutions
Source: The CFO Show, “Avoid the Pitfalls of Year-End Financial Close”
Listen as Vena's Melissa Howatson and Tom Seegmiller discuss how to avoid common pitfalls of the year-end close with Benno van Ingen, Lead Consultant CFO Tech, Finext.
The year-end close can be exceptionally challenging for several reasons, especially if your team is facing:
To help you manage and track all your tasks in the annual close process, we’ve created this downloadable checklist for you. Use it to check tasks off as you go.

Use this year-end close checklist to ensure the accuracy of your financial records while closing the fiscal year.

Continue reading for a rundown of what’s involved in each step of the year-end close process.
The financial close schedule outlines the timeline and tasks you need to complete for a successful year-end close. This will be essential for keeping your team accountable and organized.
To create your financial close schedule, start by listing all critical activities that are part of the year-end closing process. This includes reconciling all accounts, evaluating your assets and liabilities and everything else on our list below.
Once complete, use Excel or project management software to create a timeline where you assign tasks to team members, share additional context and set/track deadlines.

Pro-Tip: With Vena, you can convert your year-end close checklist into a systematic process. With Vena’s drag and drop process designer, you can visually lay out the year-end close process—including sub processes—and determine how you want tasks to be assigned to different team members in your organization.
To facilitate the steps in the year-end close, you’ll need to gather records of all your company’s financial transactions, including the following:
To speed up this process, consider using a financial close management platform that can consolidate your systems containing much of this information for you.
Vena, for instance, connects to accounting systems such as NetSuite, Microsoft Dynamics GP and SL, QuickBooks, Sage Intacct, Oracle, FinancialForce and more, along with your ERP, GL, fixed asset register or subledger.
This process focuses on ensuring your cash balances are accurate, uncovering errors and omissions and updating transactions that haven’t been recorded.
Compare each transaction in your bank statements with the corresponding entry in your general ledger, and then check for discrepancies between them.

Vena for Account Reconciliation includes pre-built templates and smart account reconciliation tools to help cut your balance sheet reconciliation times.
Accounts payable are the amounts your company owes suppliers and other third parties, while accounts receivable are the money your company expects to receive from customers.
A critical aspect of the financial close is reconciling both accounts, which involves reviewing outstanding bills and invoices, as well as vendor and customer payments, and then confirming they’re accurately recorded and represent the amounts owed.
This is an area where automation can help greatly. With account reconciliation software, you can match entries automatically, flagging only the accounts your accounting team needs to review and reconcile.

A view of a Reconciliation Dashboard available as a pre-built template within Vena for Account Reconciliation.
This step ensures your financial statements reflect the true value of your assets on the balance sheet (such as calculating and factoring in depreciation, inventory valuation etc.) and the appropriate expense on the income statement.
To do this, gather data on all company assets, including
Go over the value of each asset to ensure they’re accurate.

A view of a Fixed Asset Reconciliation Schedule available as a pre-built template within Vena for Account Reconciliation.
Depreciation is the gradual decrease in the value of an asset over its useful life — how long it stays usable and valuable to your business. It also reflects inevitable wear and tear, obsolescence, and/or loss of value of an asset.
The most common method used to calculate depreciation is the straight-line method.
To get started, estimate the asset’s useful life — the number of years you expect it to generate economic benefits for your company. Analyze historical data from your own organization, if available, and consider factors such as how long similar assets have been in use before they were retired or replaced.
Alternatively, check industry norms and guidelines for similar types of assets. Industry associations, regulatory bodies and professional organizations often provide benchmarks for useful life based on common practices within the industry.
Next, estimate a salvage value (how much you could earn from selling or disposing of the item when it’s no longer used). Then, deduct the salvage value from the asset’s cost to find the amount that needs to be depreciated over the lifetime of the asset.
Divide that number by the useful life to find the amount of depreciation to be recognized for that asset in each accounting year.
Valuing your ending inventory—how much sellable inventory you have at the end of the year—helps you get a better sense of your current assets, gross profit, and whether you’ve effectively aligned your inventory purchases and production with demand.
Your ending inventory will be recorded as a current asset on your balance sheet. The cost of the inventory you sold within the year will be subtracted from your ending inventory and added to your cost of goods sold (COGS) reported on your company’s income statement.
The basic formula for calculating your ending inventory is beginning inventory + net purchases - COGS.
To get a head start on calculating your ending inventory, use this free inventory forecasting template for Excel.
The template automatically calculates your ending inventory, also allowing you to forecast future inventory needs throughout the year, using your existing inventory trends based on purchases, usages and demand.
An income statement (also known as a profit and loss statement) provides a summary of your company's revenues, expenses and net income (or net loss) during the fiscal year.
As part of the close process, financial teams reconcile revenues and expenses, adjust for accruals and deferrals and verify the accuracy of financial data.
To prepare yours, use this free income statement template for Excel.
Your balance sheet provides a snapshot of the company's financial position during the fiscal year. It groups the company's assets, liabilities and shareholders' equity into:
Create your balance sheet using this free Excel-based template.
The template lets you view all your assets, liabilities and equity in one spreadsheet. It’ll also allow you to quickly view financial ratios such as quick ratio, current ratio, total debt to equity ratio and long term debt to equity ratio.
Planning for tax season involves:
Proactive planning during year-end close helps optimize your company’s tax position, reduce tax risks and ensure compliance with tax laws and regulations.
To complete this step, gather all necessary tax documents, such as W-2s, 1099s and other relevant tax forms. Make sure they are complete and accurate.
Collect and verify the accuracy of all relevant payroll documents for the year, including payroll registers, timesheets, employee records, tax forms (such as W-2s or 1099s), benefit enrollment forms and any other payroll-related documents.
Identify any changes in payroll throughout the year, such as employee compensation, tax withholding status or payroll policies. Verify that the changes were implemented accurately. Then, reconcile payroll records with other financial records, such as general ledger accounts, bank statements and tax filings.
Gather all employee expense reports submitted for reimbursement during the year. Ensure you have documentation for each report, including receipts and supporting documentation.
Reconcile loan balances and credit card statements. Verify that interest and principal payments are accurately recorded.
Collect all contracts, agreements and legal documents for any financial commitments your business executed during the year, such as relationships with vendors, clients, suppliers, partners, landlords and other contracts.
Review the terms and conditions of each contract to understand the rights, obligations, and responsibilities of both parties, particularly payment terms, deliverables, termination clauses, warranties, indemnities and dispute resolution mechanisms.
Identify any financial obligations from the contracts, then record relevant information (such as contract values, payment schedules and billing cycles) in your records.
Create an updated accounts receivable aging report and review it to identify overdue invoices and aging balances.
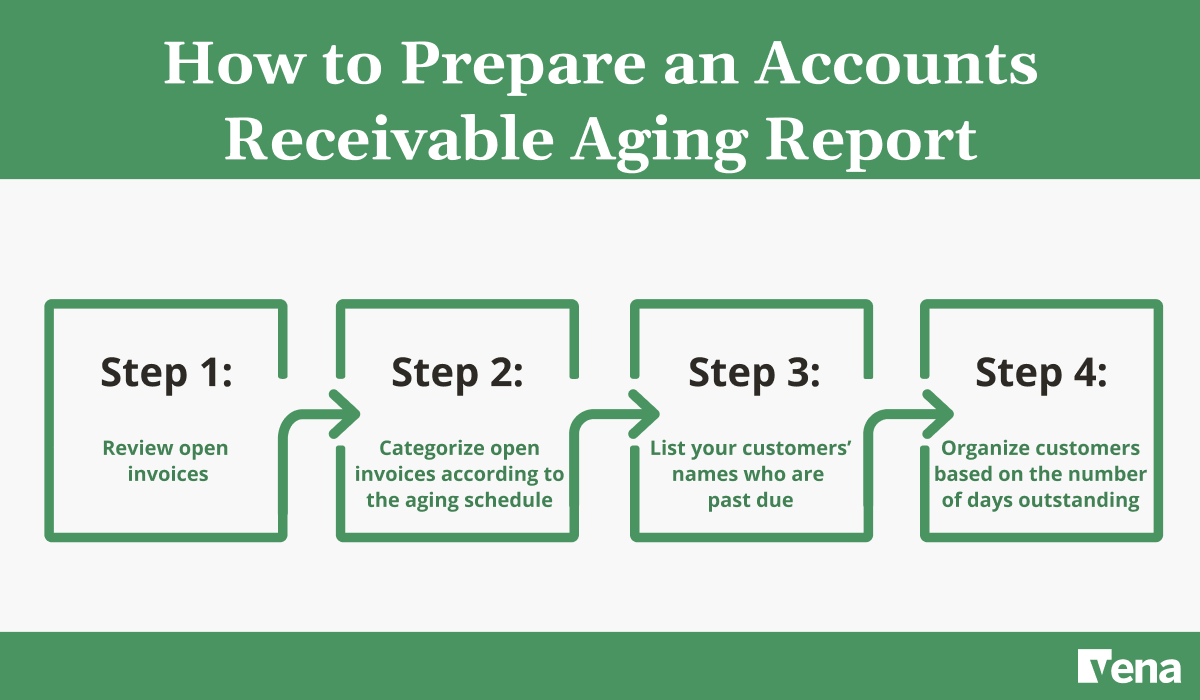
Aging reports categorize outstanding receivables based on their age, typically into 30-day, 60-day, 90-day and over 90-day buckets.
Analyze the payment history of the accounts to assess how likely they are to pay. Can you collect on any of those past-due invoices before the end of the year? Start there.
Then, for all other outstanding receivables, consider factors such as past payment patterns, communication with the customer and any disputes or issues that may affect payment.
And then, based on your assessment, estimate the portion of accounts receivable that is unlikely to be collected and determine whether you'll need a bad debt provision for the rest.
Review individual transactions in each general ledger account and verify that transactions are correctly recorded, classified, and summarized according to the chart of accounts. Then, reconcile them with supporting documentation (bank statements, invoices, receipts etc.)
If you haven't already, automate this step using account reconciliation software to
Preparing your cash flow statement involves summarizing the cash inflows and outflows from operating, investing and financing activities during a specific reporting period. The way you calculate your cash flow will depend on whether your organization uses the direct or indirect method.
Having a financial close schedule establishes a roadmap for completing the necessary activities within the agreed timeframe.
Documenting the actual execution of the year-end close process, on the other hand, involves maintaining thorough records of the process.
Some companies don’t have a well-established closing process, creating significant challenges as team members resort to relying on memory. But by taking the time to establish documentation—even if your financial close process itself isn’t perfect—you’ll avoid more work for your team in the long run.
Assess how the year end close process went this year, identify opportunities for improvement
and set goals for next year’s financial close process, including which steps you’ll want to
complete early.
Financial close software automates the whole year-end process, giving you and your team more time to focus on more strategic tasks.
Tanger Outlets, for example, used Vena to speed up its financial close process. Before using the software, Director of Financial Reporting, Michelle Canada and her team relied on Excel spreadsheets to manually input their general ledger data.
Every time an entry arrived late or a change occurred in the general ledger after the schedule was reviewed, her team needed to re-save the Excel spreadsheet as a PDF before once again verifying the check marks on the list.
But with Vena, Tanger eliminated its checkmark-to-PDF checklists and integrated its general ledger data into its Excel spreadsheets to create a single source of truth. And with more time on their hands, Tanger’s auditors have identified and resolved transaction inconsistencies.
As a result, the team cut their year-end close time from three weeks to just two.

Vena makes it easy to maintain all your month-end and year-end close processes such as financial consolidations, account reconciliations and tax provisioning.

Year-end financial statements are a set of comprehensive reports that summarize your company's financial health and performance for its entire fiscal year. They include:
Month-end accounting involves analyzing your company’s financial transactions, adjustments, and reporting activities that occurred within a single month. On the flip side, year-end accounting involves doing the same things, but for your entire fiscal year.
Closing the books is the same as year-end closing, quarter-, and month-end close. It’s a general term used to describe the process of analyzing and preparing your financial statements for these accounting periods.
Fiscal year-end is a consecutive twelve-month period that a company chooses for financial reporting purposes. Unlike the calendar year, which runs from January 1st to December 31st, a fiscal year is determined by the company.
Jessica Tee Orika-Owunna, Senior Content Marketer for B2B SaaS and Finance Companies
Jessica Tee Orika-Owunna is a content strategist and writer with over seven years of experience creating and repurposing relatable, helpful content for global brands including Contentsquare, Softr, Hotjar and Vena. She specializes in turning everyday product, user, and subject matter expert insights into product-led content that answers real buyer questions and supports better business outcomes.